By Delbert G. Voight
This article is this week’s Agronomy Highlight, recorded live on Fridays at 9:00 am. The Agronomy Highlight is an opportunity for readers to ask the author questions and hear updates from around Pennsylvania. Join the Agronomy highlight live on
Facebook or
zoom or join by calling +1 646 876 9923, and when prompted enter the webinar ID: 946 6516 7271.
It's that time of the year that the planter will again enter the field and begin the process of providing feed and forage for farms across the commonwealth. If you remove weekends and bad weather, University Specialists estimate only several days are open to planting the crop when conditions are ideal. The planting operation is one of the most critical steps in achieving yield and quality. It also is the biggest reason why the adoption of narrow rows and high populations has failed on some farms, due to improper planter tune-up. The goal of the planter or drill is to open a furrow place the seed at the same depth so that each seed will develop and create a tabletop look in the field. Here we see a double planted corn seed result in the left of the picture (Figure 1). This creates a major problem later in the season. When I took this image, we were conducting a survey of corn stands to see how accurate growers were planting at emergence stages.
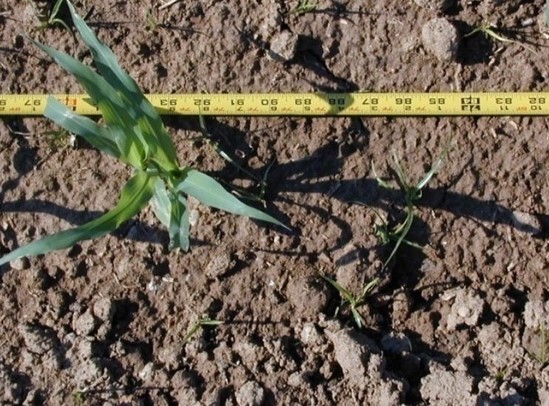
Figure 1. A “double" corn plant at the left of the photo – D. Voight
This uniform stand and emergence time will allow the plants to compete evenly throughout the season and achieve maximum sunlight interception and conversion to economic yield. When plants fail to emerge uniformly the late-emerging plants will act as a weed and result of a net loss in yield. In this image (Figure 2) we can then see the consequence of this late emergence. The smaller plant will certainly affect the plants surrounding it and will not be adding much to the final yield.
Figure 2. A late-emerging corn plant, which acts as a weed. D.Voight
Skips in the row will result in weed encroachment and the loss of yield from that part of the field. Those late emergers also end in barren or nubbin ears and further reduce quality. Lynn Hoffman, former Penn State Agronomist, related that in some cases missing plants (skips) and late emergers due to seed depth variation may result in a 30% reduction in overall yield. These ears (Figure 3) are from a field that had issues at planting and the nubbins can be seen easily at harvest.
Figure 3: Variation in ears caused by improper planter performance. D. Voight.
This is the reason why planter maintenance is critical to maximize that field's yield. Growers only have one chance to set the crop stage for success and it begins by getting the planter into the shop and tuning it and not during the key times that the planter should be planting instead of sitting in the shop. Purdue Extension (as well as other Universities) had done some research into the losses that were due to plant error in the deviation from the mean spacing. What they found was that for each inch deviation from 2 inches, there was a 2.5 bushel loss per acre. I am sure this might have changed over the last couple of years, but the point is losses occur when the plants get too far or too close from each other within the row. Basically, if you were shooting for say 5 inches between plants on average (mean) how close to that were actually in the field at that spacing. I surveyed a planter for each row. Here (Figure 4) is a schematic of 19 plants that resulted in a terrible 5.3-inch deviation. That means that the plants could be 10 or more inches between each other in the field. I use a simple excel sheet on my smartphone to do this but there are planting monitors that do this all for you in the cab as you plant! Wow! Look at that; some were almost 25 inches from the mean!
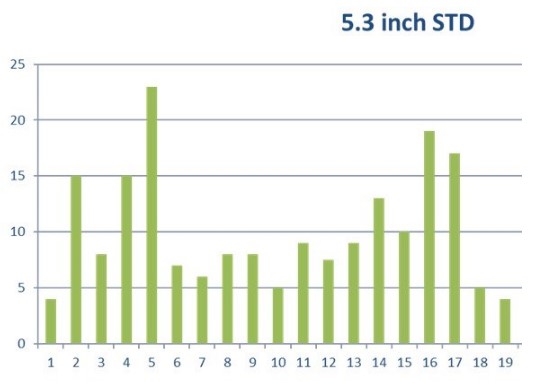
Figure 4
In this example (Figure 5) 28 plants in another row unit are deviating only 2.2 inches STD and that is pretty much about as good as I have seen even in some tremendous 300 bushel fields. Still, there are some 12-inch plant spacings but overall pretty acceptable. In this case, we could check the planter and find out why the one row is not performing and sure enough there were issues with the tube feeding that row.
Figure 5
So what? A few years ago our team did a random survey of fields just to check out PA growers’ deviations.
- Remember STD of 2 inches is the best achievable and of the 78 fields in 8 counties this represented 8% of PA Fields
- STD of 3 inches is in only 34% of PA Fields
- STD of 4-5 inches found in 40% of PA Fields
- STD of 6 inches found in 18% of PA Fields
We should really repeat this as I am sure and hopeful that our accuracy in PA has increased as with over 58% of our fields there is some room for an economic return just by taking time to adjust the planter. One corn contest grower member I sampled had a 1.8 STD and achieved over 300 bushels per acre!
Here are some points to consider. Starting at the front and working to the exit.
- The initial opener (wavy coulter or fluted) serves to cut open the residue to allow the disc opener to work its magic. The front coulter bears the brunt of wear and should be checked and replaced more often. Be sure the coulters do not cut deeper than the disc openers by checking its alignment with the disc opener.
- Most plant stands that I view that suffered from planter error were victim to the oversight of the disc openers not to mention that the front coulter is shot. The disc openers can be easily checked and replaced by the operator. You can be sure I will check them if the stand I view is poor. The disc opener serves to lay a V trench that receives the seed and sets it at the bottom of the V. If the discs are worn the trench turns into a W and the seed is placed at varying positions ending up with uneven emergence. Simply taking two business cards and positioning them one from between the disc openers on the bottom and one from top should reveal that they stop about 3 inches from each other. At least the card should not be easily slipped between them. I have seen them as wide as a half-inch between. In some cases, some shims placed on the shaft will help move the discs together. Replacement may be necessary. Take the time now to replace them and not when the soil temperature is 50°.
- The closing wheels can make or break the planting process. On loose ground, closing wheels with too much pressure can kick the seed up in the V slot and ruin the disc openers intended purpose. The goal of the closing wheel is to close the V slot and firm soil around the seed. On hard-packed soil, the closing wheels will need more pressure (maybe even cast closing wheels) to ensure seed coverage and firming. I have been in too many fields that the V slot is left almost wide open due to failure to provide enough down pressure to close the furrow. The closing wheels should be in the centerline of the disc openers. To check simply place a ruler between the discs wedged on the center line and then again between the closing wheels it should be center. Also, one might find, depending on soil moisture, that the spoked wheel closing units and or a mix of one spoked and one cast and or plastic might need to be experimented with for each varying soil to ensure seed trench closure. At our research farm, we have been using the hybrid system and it has been working quite well if the soil is just a bit too wet.
- Check for in-line flow from front to back and side to side. Normally I find the outer row units to be bent (quite severely in some cases) due to the turning action of the planter when the units might not have been completely out of the soil. Yes, I am guilty of this as well! Sure, most of you will say I don’t have that problem but have you checked lately?
- While you are there, check the gauge wheels that control the planting depth. This is one thing with no-till or rolling the gauge wheels will need to be set to get the seed to the proper depth depending on the residue above the soil surface. I saw this last year in wheat with heavy 3-inch corn fodder the gauge wheels were set just tad shallow and the seed got placed on the soil surface and some got into the soil a half-inch or so which ultimately led to some uneven greening up and growth. Gauge wheels should touch the double-disc openers when a load is on the planter unit in the field. If gauge wheels are too far away from the disc blades, soil will get into the seed trench before the seed gets there! Again, shims can be used to take up the space.
- Most common planters have a seed hopper that holds the seed, and the seed drops through a tube to the disc openers. In addition, many planters have an eye sensor that sees the seed and transmits a signal to a unit to let the operator know the seed is moving through the tube. The tube and eye should be cleaned especially mice nests that somehow get into the tubes should be removed.
- The seed metering device should be cleaned as well. Air and vacuum metering devices should be disassembled and cleaned, and all air supply tubes and seals checked for leaks or cracks. On finger pick up units the brush (have not replaced in two years then replace now) and back plate should be viewed and worn parts replaced. Many dealer locations offer a service to check the metering devices for proper function for a modest fee. I highly recommend this service. If not done last fall, now is a good time to get that accomplished. All normal grease and lubricants should be used on chains and key pivot points.
- Each planter unit should be lifted to determine if the bushings need to be tightened or replaced. If more than ¾ inch of play is noted when the unit is lifted the bushing should be replaced. While the planter is lifted (be sure stops are in place for safety) check to see if all units are level with each other from side to side.
- Many planters come with fertilizer or insecticide delivery systems. These too will need attention. In some fields that were injured by fertilizer, the application of the materials was too close to the seed or in one case three out of six rows had fertilizer applied directly on the seed causing severe stand loss. Check to see that a 2 by 2 placement of the material is achieved by again using a set of straight sticks center on the seed trench and another center on the fertilizer tube. If liquid, be sure the nozzle is directed to the proper location. Dry insecticide boxes should also be cleaned of mouse nests and the metering device checked for wear. It is critical to be sure that the T band or in furrow tube is properly placed. I was involved in a failure to control insects due to the T band applicator being partially plugged or completely missing. You can expect if I visit your farm for a stand assessment I will be visiting your planter.
- One final note is leveling. The bottom of tongue should be leveled with a bubble level. To accomplish a level planter the drawbar can be raised or lowered as needed. By ensuring the operation of all components of the planter the few days of ideal planting conditions this spring can be well utilized in the field and not in the shop.
Now we can focus on soybeans! Data can really get confusing, due to the fact, that soybeans can and will respond to planting date and population by varying the pod counts. This negates a lot of the issues with corn. Here is a picture (Figure 6) of pod counts from our PSB On-Farm Soybean test of soybean populations. The far left has pods of over 150 per plant vs only about 40 on the far right what’s the difference ... population. 25000 ppa vs 140000 ppa respectively. Yes, each and every plot were counted and tabulated with some areas over 250 pods per plant in the lower population area.
Figure 6: Soybean plants responding to various populations. D. Voight
The key to all of this was that soybeans can adapt to a lot of variability at planting and still yield well. This table then is an example of that ability. Our data really supports the Agronomy guide replanting soybean guidelines and below 90,000 ppa replanting becomes more important. For more on this please visit the planting guide for soybeans in the Agronomy Guide.
So here are some tips for planting soybeans:
- Strive for uniform depth of planting. I typically had more trouble calls with soybean emergence from deep placement below 1.25 inches deep. Particularly with compaction (both surface and sidewall compaction) at planting time. Pests such as slugs really like to be in that trench as well. It’s very important to get the soybean up and out as quickly as possible.
- The big key is to plant when soil is ideal to avoid smearing the soybeans into the soil. In the past, most situations where I see K deficiency in the season is caused by compaction. I diagnosed by pulling a soil test and though the K levels were ideal, the deficiency led us to inspect roots where we could then easily see the channeling of the roots down the furrow. Keep in mind soybeans desire lots of root hairs to assist in getting proper inoculation and compacted soils can increase the root width to push through the soil and this may limit root hairs.
- One might think I would recommend a planter over a drill. However Dr. Greg Roth and I have trialed side by side and if everything is equal row width, population and depth we did not observe any significant difference between the planting options. My bias is however toward a planter as it makes a big difference trying to count plants and manage uniform depth. But from a return on investment, it does not seem to matter the type of planting equipment utilized for yield.
On a final note, I encourage readers to check out the Agronomy guide planting recommendations for corn and soybeans. We have added some very useful tables and planting date maps for the state as well as detailed replant instructions should one be in need of direction to that end. Below (Figure 7) I snapped a quick picture of our planter set up at SEAREC. Once set, everything worked well and we continue to produce exceptional yields at the station.
Figure 7: Checking for uniform planting depth and spacing in no-till soybeans. D. Voight
Source : psu.edu